East Anglia Sea Angling
My own thoughts on my fishing and related exploits in 'Bootiful' East Anglia
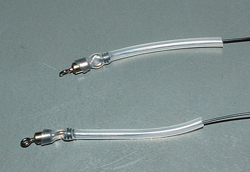
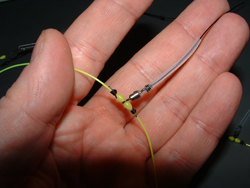
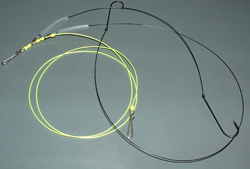
Two Hook Bomber |
||
1. Components
2. Hooks tied and silicone tube pushed over the dropper swivel barrels.
3. One of the droppers trapped between aero beads and stop knots.
4. The completed rig minus stop knots and bait stops. |
|
|
I think it used to be called the "Clacton" rig and owes some if not all of its development to Richard Holgate the well known Essex rod, who cleaned up with this rig on the east coast circuit. My version of this match winning bad boy uses these components:
I only use this rig if I'm match fishing, so you can appreciate it doesn't get too many outings nowadays. In a pleasure fishing situation if you wanted to use two hooks you'd probably opt for one up one down or a wishbone. If I was pleasure fishing and it was all out distance work, I'd use a clipped down pennel, wishbone or the one hook bomber, purely because they are less prone to tangle and I wouldn't be targeting bits at range. I have tried tying off the hook lengths with the water knot technique I used with the one hook bomber, it doesn't work well and the trapped swivel is definitely the way to go with this rig.
I should explain I have nothing against crimps other than I can be a bit ham fisted with them. I've over crimped crimps in the past and had them part the rig body on the cast. I use stop knots primarily because they allow a little flexibility in the set up and I can be as ham fisted as I like with them without doing any damage to the rig body. The downside to stop knots is that they can be a bitch to move once they've been wetted a few times during a fishing session. Another big advantage with stop knots is that as the hook length stretches a little in the cast, I can re adjust the stop knot to take up any elongation of the hook length, something that will happen if you're casting hard. I can also use them as a shock absorber by setting them slightly tighter, so the weight is hanging on them rather than the rig body, not too much mind, and allowing the force generated by casting to take out the "slack" in the rig body. This makes sure the hooks and bait stay on the bait clip during the cast. You can of course put as much iron mongery as you like, SRT springs, impact shields if you're using large baits, whatever, it's entirely up to you and what you feel confident with. This rig was primarily designed to deliver two baited hooks the maximum distance, though none of us should ever lose sight of the fact that all any rig must do is deliver a well presented bait to where the fish are feeding, anything else is extravagance. |
||